Difference between revisions of "Howto NetAsq"
(Created page with "== Introduction == This guide provides information that can be used to configure a NETASQ UTM running firmware version ''8.0.0.2 (tested also with 7.0.5)'' to support IPsec V...") |
|||
| (4 intermediate revisions by the same user not shown) | |||
| Line 23: | Line 23: | ||
A wizard is launch | A wizard is launch | ||
| − | [[ | + | [[File:NetASQ-img1.png]] |
Define the parameters | Define the parameters | ||
| Line 29: | Line 29: | ||
*Template = Good Encryption | *Template = Good Encryption | ||
| − | [[ | + | [[File:NetASQ-img2.png]] |
Define the parameters | Define the parameters | ||
| Line 35: | Line 35: | ||
*Enable ''Advanced Mode'' | *Enable ''Advanced Mode'' | ||
| − | [[ | + | [[File:NetASQ-img3.png]] |
Define the parameters | Define the parameters | ||
| Line 41: | Line 41: | ||
*Select VPN Peer = Any | *Select VPN Peer = Any | ||
| − | [[ | + | [[File:NetASQ-img4.png]] |
Define the parameters | Define the parameters | ||
| Line 47: | Line 47: | ||
*REMOTE hosts/networks = Any | *REMOTE hosts/networks = Any | ||
| − | [[ | + | [[File:NetASQ-img5.png]] |
Define the parameters | Define the parameters | ||
| Line 55: | Line 55: | ||
Click in ''Pre-Shared Key Configuration'' | Click in ''Pre-Shared Key Configuration'' | ||
| − | [[ | + | |
| + | [[File:NetASQ-img6.png]] | ||
Add a key | Add a key | ||
| Line 63: | Line 64: | ||
*Pre-Shared Key = mysharedsecret | *Pre-Shared Key = mysharedsecret | ||
| − | === | + | === Configuring Filtering Rules === |
Navigate to the Policy => Filering | Navigate to the Policy => Filering | ||
The Firewall Rules is not Automatically create | The Firewall Rules is not Automatically create | ||
| − | [[ | + | [[File:NetASQ-img7.png]] |
The first 4 are required | The first 4 are required | ||
| Line 90: | Line 91: | ||
Disable WINS | Disable WINS | ||
Disable DNS | Disable DNS | ||
| − | |||
=== Authentication Tab === | === Authentication Tab === | ||
| Line 126: | Line 126: | ||
== Resources == | == Resources == | ||
| − | [ | + | [[Media:netasq.vpn.txt]] |
Latest revision as of 05:23, 9 January 2013
Contents
Introduction
This guide provides information that can be used to configure a NETASQ UTM running firmware version 8.0.0.2 (tested also with 7.0.5) to support IPsec VPN client connectivity. The Shrew Soft VPN Client has been reported to inter-operate correctly with NETASQ UTM devices.
Overview
The configuration example described below will allow an IPsec VPN client to communicate with a remote private network but this NETASQ UTM does not support modcfg (ike push/pull) fonctionnality
Gateway Configuration
This example assumes you have knowledge of the NETASQ GUI configuration interface. For more information, please consult your NETASQ product documentation.
Interfaces
Two network interfaces are configured. The WAN interface has a static public IP address which faces the internet. The LAN interface has a static private IP address of 192.168.254.254 which faces the internal private network.
Configuring VPN Rules
Using the NETASQ GUI, navigate to the VPN => IPSec Tunnels configuration area.
Select a slot and click to Edit
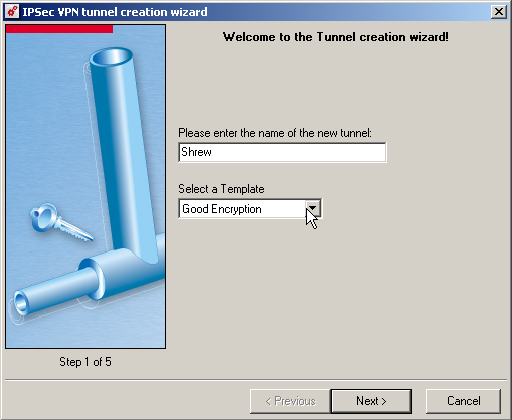
A wizard is launch
Define the parameters
- Name of tunnel = Shrew
- Template = Good Encryption
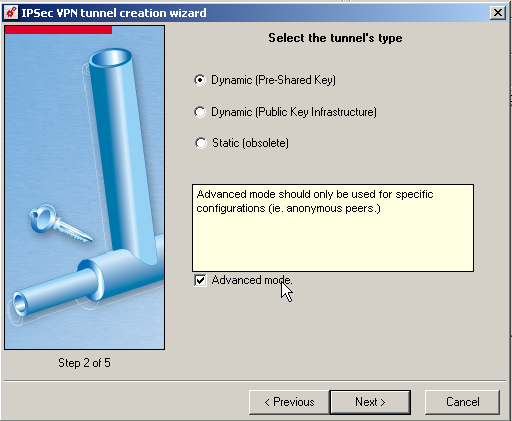
Define the parameters
- Tunnel Type = Dynamic (Pre-Shared Key)
- Enable Advanced Mode
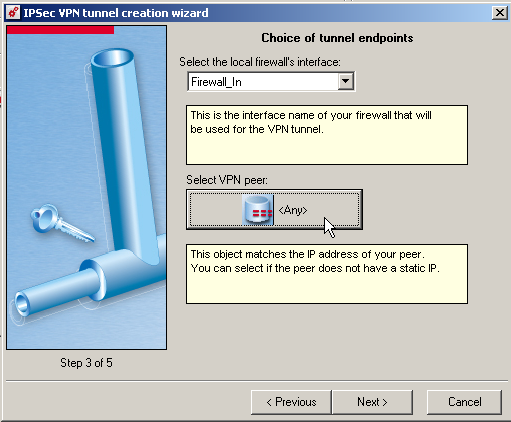
Define the parameters
- Local Firewall = Firewall_in
- Select VPN Peer = Any
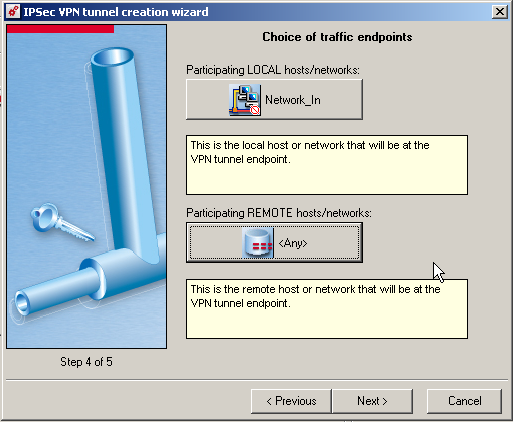
Define the parameters
- LOCAL hosts/networks = Network_in
- REMOTE hosts/networks = Any
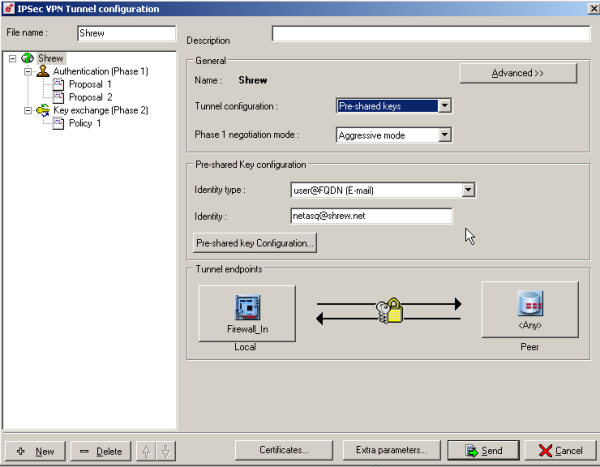
Define the parameters
- Phase 1 negotiation mode = Aggressive mode
- Identity type = user@FQDN (E-mail)
- Identity : netasq@shrew.net
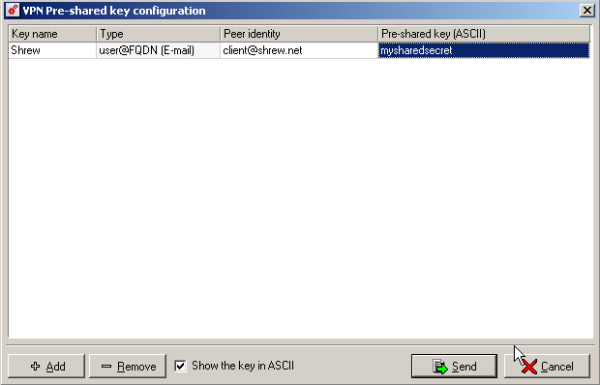
Click in Pre-Shared Key Configuration
Add a key
- Key Name = Shrew
- Type = user@FQDN (E-mail)
- Peer identity = client@shrew.net
- Pre-Shared Key = mysharedsecret
Configuring Filtering Rules
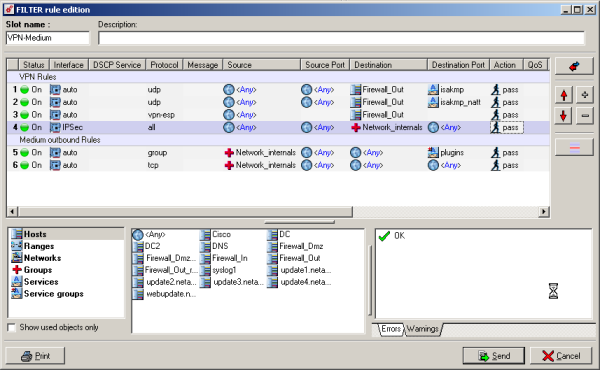
Navigate to the Policy => Filering
The Firewall Rules is not Automatically create
The first 4 are required
- Rule 1 : Allow the ISAKMP Protocol
- Rule 2 : Allow the ISAKMP-T Protocol
- Rule 3 : Allow the ESP Protocol
- Rule 4 : Allow the traffic for IPsec Tunnel to Internal Networks
Client Configuration
The client configuration in this example is straight forward. Open the Access Manager application and create a new site configuration. Configure the settings listed below in the following tabs.
General Tab
The Remote Host section must be configured. This Host Name or IP Address is defined as your public WAN IP to match the NETASQ WAN interface address.
Set the Address Method to Use a existing adapter and current address
Name Resolution Tabb
Disable WINS Disable DNS
Authentication Tab
The client authentication settings must be configured. The Authentication Method is defined as Mutual PSK.
Local Identity Tab
The Local Identity parameters are defined as User Fully Qualified Domain Name with a UFQDN String of "client@shrew.net" to match the NETASQ UTM Policy definition.
Remote Identity Tab
The Remote Identity parameters are defined as User Fully Qualified Domain Name with a UFQDN String of "netasq@shrew.net" to match the NETASQ UTM Policy definition.
Credentials Tab
The Credentials Pre Shared Key is defined as "mypresharedkey" to match the NETASQ UTM Policy definition.
Phase 1 Tab
The Proposal section must be configured. The Exchange Type is set to aggressive and the Key Life Time Limit is set to 21600 (secs) to match the NETASQ UTM Policy definition.
Phase 2 Tab
The Proposal section must be configured. The PFS Exchange is set to group 2 to match the NETASQ UTM Policy definition.
Policy Tab
The IPsec Policy information must be manually configured when communicating with NETASQ UTM. Create an include Topology entry for each IPsec Policy network created on the NETASQ UTM. For our example, a single Topology Entry is defined to include the 192.168.254.0/24 network.
Known Issues
None reported.
