Difference between revisions of "Howto Netgear"
| (One intermediate revision by the same user not shown) | |||
| Line 88: | Line 88: | ||
A VPN Client User Account defines the password that will be used for a particular username. Navigate to the following screen using the Menu list at the top of the browser interface. | A VPN Client User Account defines the password that will be used for a particular username. Navigate to the following screen using the Menu list at the top of the browser interface. | ||
| + | [[File:Netgear-nav-3.jpg]] | ||
| − | |||
Define a User Name and Password for each user that will connect using the VPN Client software and click Add to add them to the Configured Users list. | Define a User Name and Password for each user that will connect using the VPN Client software and click Add to add them to the Configured Users list. | ||
| − | + | [[File:Netgear-pic-3.jpg]] | |
| − | [[ | ||
== Client Configuration == | == Client Configuration == | ||
| Line 133: | Line 132: | ||
== Resources == | == Resources == | ||
| − | [ | + | [[Media:netgear.vpn.txt]] |
Latest revision as of 05:26, 9 January 2013
Contents
Introduction
This guide provides information that can be used to configure a Netgear Prosafe FVS33x or FVX53x device running firmware version 3.0.4+ to support IPsec VPN client connectivity. The Shrew Soft VPN Client has been tested with Netgear products to ensure interoperability.
Overview
The configuration example described below will allow an IPsec VPN client to communicate with a single remote private network. The client uses the pull configuration method to acquire the following parameters automatically from the gateway.
- IP Address
- IP Netmask
- DNS Servers
- WINS Servers
Gateway Configuration
This example assumes you have knowledge of the Netgear gateway Web configuration interface. For more information, please consult your Netgear product documentation.
Create a Mode Config Record
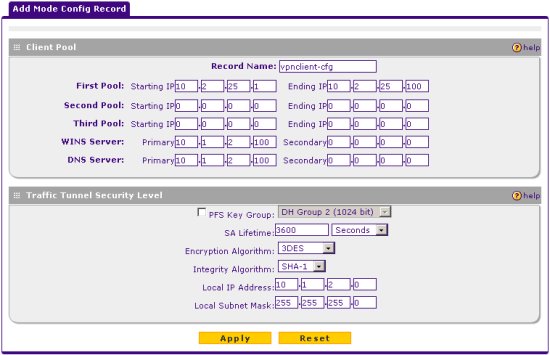
A Mode Config record is used to define configuration settings that are automatically obtained by the client. This includes private network IP address assignment as well as DNS and WINS server settings. Navigate to the following screen using the Menu list at the top of the browser interface.
Click the add button and define the following parameters.
Client Pool
- Record Name = vpnclient-cfg
- First Pool = 10.2.25.1 - 10.2.25.100
- WINS Server = 10.1.2.100
- DNS Server = 10.1.2.100
Traffic Tunnel Security Level
- PFS Key Group = Unchecked
- SA Lifetime = 3600 Seconds
- Encryption Algorithm = 3DES
- Integrity Algorithm = SHA-1
- Local IP Address = 10.1.2.0
- Local Subnet Netmask = 255.255.255.0
When finished click Apply.
Create an IKE Policy
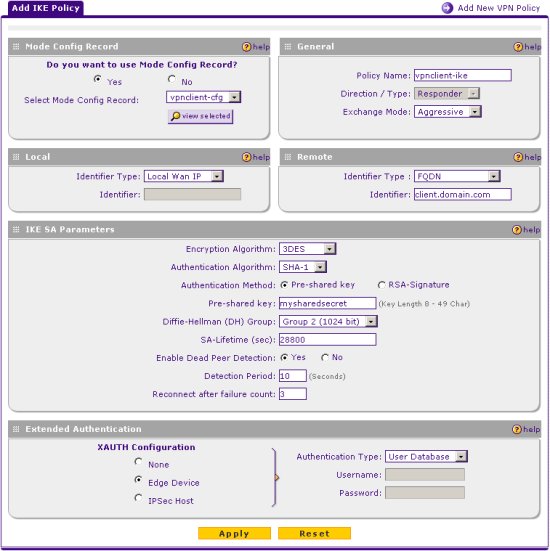
An IKE Policy is used to define the parameters used to negotiate the phase1 ISAKMP SA. Navigate to the following screen using the Menu list at the top of the browser interface.
Click the add button and define the following parameters.
Mode Config Record
- Do you want to use Mode Config Record? = Yes
- Select Mode Config Record = vpnclient-cfg
General
- Policy Name = vpnclient-ike
- Exchange Mode = Aggressive
Local
- Identifier Type = Local Wan IP
Remote
- Identifier Type = FQDN
- Identifier = client.domain.com
IKE SA Parameters
- Encryption Algorithm = 3DES
- Authentication Algorithm = SHA-1
- Authentication Method = Pre-shared key
- Pre-shared key = mysharedsecret
- Diffie-Hellman Group = Group 2 (1024 bit)
- SA-Lifetime (sec) = 28800
- Enable Dead Peer Detection = Yes
- Detection Period = 10 seconds
- Reconnect after failure count = 3
Extended Authentication
- XAUTH Configuration = Edge Device
- Authentication Type = User Database
When finished click Apply.
Create VPN Client User Accounts
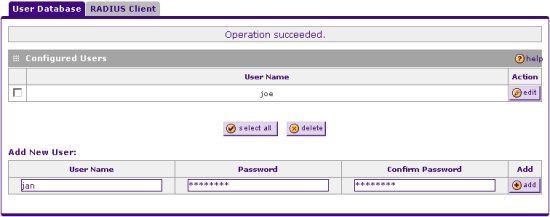
A VPN Client User Account defines the password that will be used for a particular username. Navigate to the following screen using the Menu list at the top of the browser interface.
![]()
Define a User Name and Password for each user that will connect using the VPN Client software and click Add to add them to the Configured Users list.

Client Configuration
The client configuration in this example is straight forward. Open the Access Manager application and create a new site configuration. Configure the settings listed below in the following tabs.
General Tab
The Remote Host section must be configured. This Host Name or IP Address is defined to match the Netgear WAN Internet IP address. The Auto Configuration mode should be set to ike config pull.
Phase 1 Tab
The Proposal section must be configured. The Exchange Type is set to aggressive and the DH Exchange is set to group 2 to match the Netgear IKE Policy definition.
Authentication Tab
The client authentication settings must be configured. The Authentication Method is defined as Mutual PSK + XAuth.
Local Identity Tab
The Local Identity parameters are defined as Fully Qualified Domain Name with a FQDN String of "client.domain.com" to match the Netgear IKE Policy Remote Identity value.
Remote Identity Tab
The Remote Identity parameters are defined as IP Address with Use a discovered remote host address to match the IKE Policy Local Identity value.
Credentials Tab
The Credentials Pre Shared Key is defined as "mysharedsecret" to match the Netgear IKE Policy Pre-shared key value.
Policy Tab
The IPsec Policy information must be manually configured when communicating with Netgear gateways. Create an include Topology entry that matches the Local IP Address and Local Subnet Netmask of the Netgear Mode Config record. For our example, a single Topology Entry is defined to include the 10.1.2.0/24 network.
Known Issues
The Netgear Firmware has several known issues with DPD. Version 2.2.0 apha 2 and later versions of the Shrew Soft Client include code to work around these issues. If using 2.1.x client versions, you will need to disable DPD support.

