Howto Juniper SSG Using Certs
Contents
Introduction
This guide describes how to setup a dial-up connection between a ScreenOS device and the Shrewsoft client, using certificates for mutual authentication. In this guide every user uses its own certificate. A self signed CA is setup and used for signing the certificates of the users and the ScreenOS device. Certificates are created by using openssl.
Summary
Configuration of the ScreenOS device and the Shrewsoft client to use certificates does not differ very much from the xAuth setup. More tricky is the creation of the certificates, especially when self-signed certificates are used:
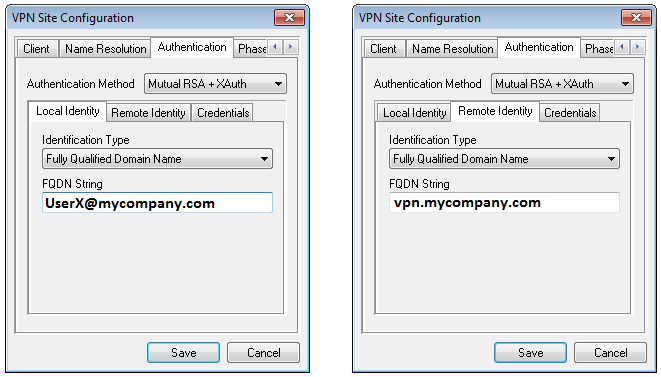
- Make sure that your ScreenOS certificate contains a 'Subject Alternative Name' in this format: 'DNS:<vpn.mycompany.com>' (FQDN)
- Make sure that your Client certificates contain a 'Subject Alternative Name' in this format: 'email:<UserX@mycompany.com>' (UFQDN)
Additionally, the ScreenOS and the Shrewsoft client have to be configured to use xAuth authentication in the 'Auto Key Advanced' section.
Part 1 - Certificates
Root CA - Create Root CA Certificate
Creating private key for CA
openssl genrsa -des3 -out CA.key 4096
Create root certificate
openssl req -new -x509 -days 7300 -key CA.key -out CA.crt
Output: CA.crt (certificate)
Output: CA.key (private key of certificate)
Root CA - Install Root CA Certificate
Load root CA certificate to the ScreenOS Device
- Objects -> Certificates (navigate to you local CA.crt file and upload it)
Disable certification revocation list (optional). If you do not want / need to maintain a certificate revocation list you can disable it on the screenos device. [01] explains how to do this.
ScreenOS Certificate - Creation
Create Certificate
- Objects -> Certificates -> New
Define some meaningful string for 'FQDN' (vpn.mycompany.com), then chose 'Generate'. Now the ScreenOS device creates the certificate and a certificate signing request (CSR). Export the csr file to having it signed by your CA.
Output: Screenos_csr.txt (Certificate Signing Request)
ScreenOS Certificate - Sign CSR
As described here [01], if you use some self created CA certificate, create a text file named subj.txt containing the string 'subjectAltName="DNS:vpn.mycompany.com"'
openssl x509 -req -days 7300 -in Screenos_csr.txt -CA CA.crt \
 -CAkey CA.key -set_serial 01 -out Screenos.crt -extfile subj.txt
Output: Screenos.crt (Screenos Device Certificate)
ScreenOS Certificate - Upload Certificate
Objects -> Certificates
- Navigate to the location of certificate, select certificate
- Confirm with 'Load'
User Certificate - Creation
Create private key for user X
openssl genrsa -des3 -out UserX.key 4096
Create certificate signing request
openssl req -new -key UserX.key -out UserX.csr -subj "/CN=UserX/emailAddress=UserX@mycompany.com"
User Certificate - Sign CSR
If you use some self created CA certificate create a file subj.txt with the string 'subjectAltName="email:UserX@mycompany.com"'
openssl x509 -req -days 3650 -in UserX.csr -CA CA.crt -CAkey CA.key \
 -set_serial 01 -out UserX.crt -extfile subj.txt
Part II - ScreenOS Setup
New User
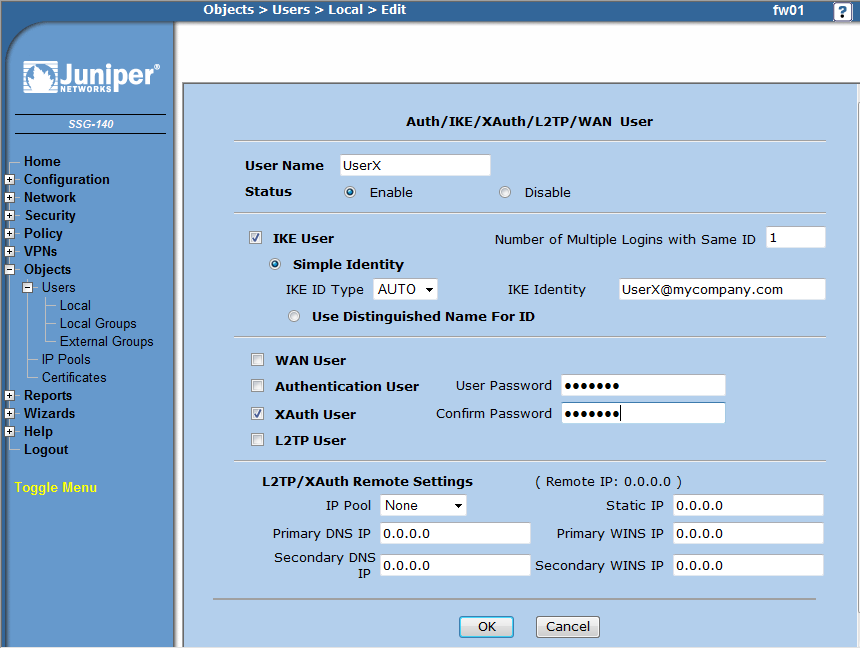
Create a new user object for every user:
- Objects -> Users -> Local -> new
- Important here it that you select 'IKE User' - 'Simple Identity' and place 'UserX@mycompany.com' into the 'IKE Identity' field
- Additionally select 'XAuth User' and define a password (or use e.g. xAuth with your radius server).
New Group
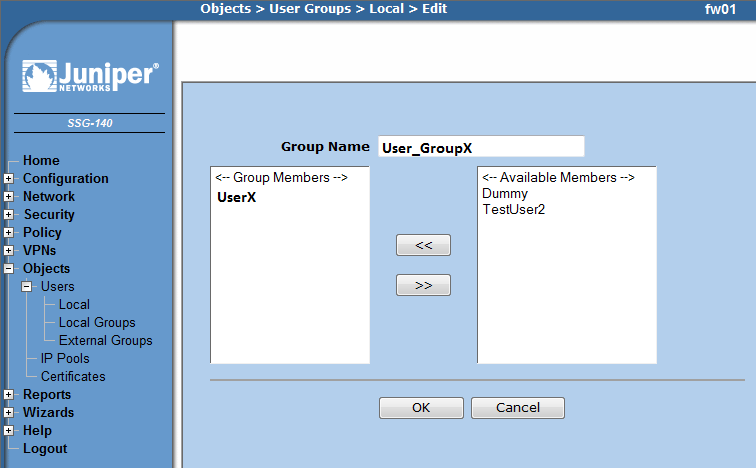
Create a new group and add the defined users to this group
- Objects -> Users -> Local Groups -> new
- Add the users and add them to the group
New Gateway
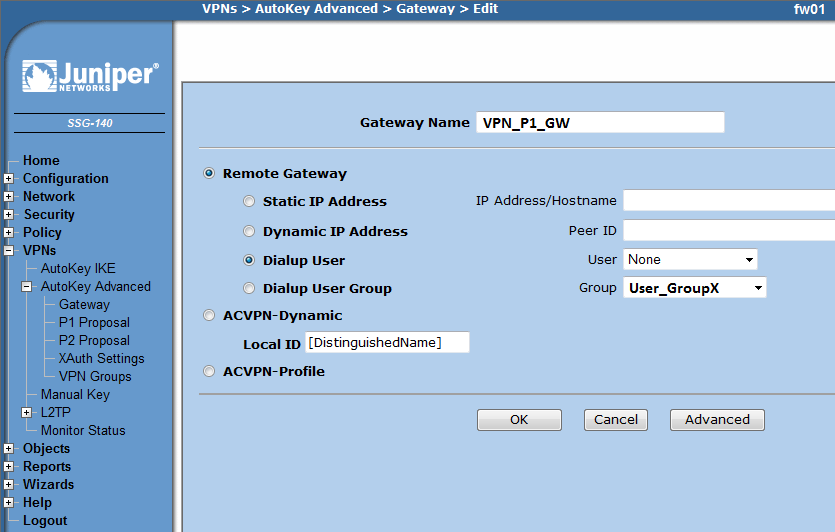
Create a new Gateway object
- VPNs -> AutoKey Advanced -> Gateway -> new
- Select 'Dialup User Group' and select the group you previously defined
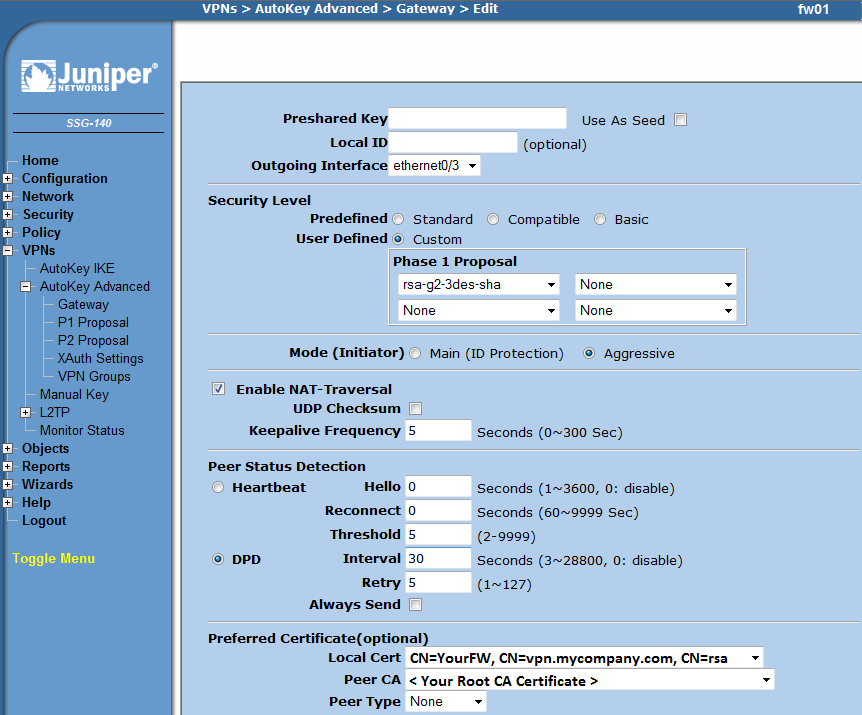
- Advanced
- Select correct outgoing interface (were your device is connected to the internet)
- Under 'Security Level' select 'Custom' and chose 'rsa-g2-3des-sha'
- Under 'Mode' selet 'aggressive'
- Select 'Enable NAT-Traversal'
- Under 'Peer Status Detection' select DPD and enter 30 seconds for 'Interval'
- Under 'Preffered Certificate' select
- Signed certificate (Screenos.crt) in 'Local Cert'
- CA certificate (CA.crt) in 'Peer CA'
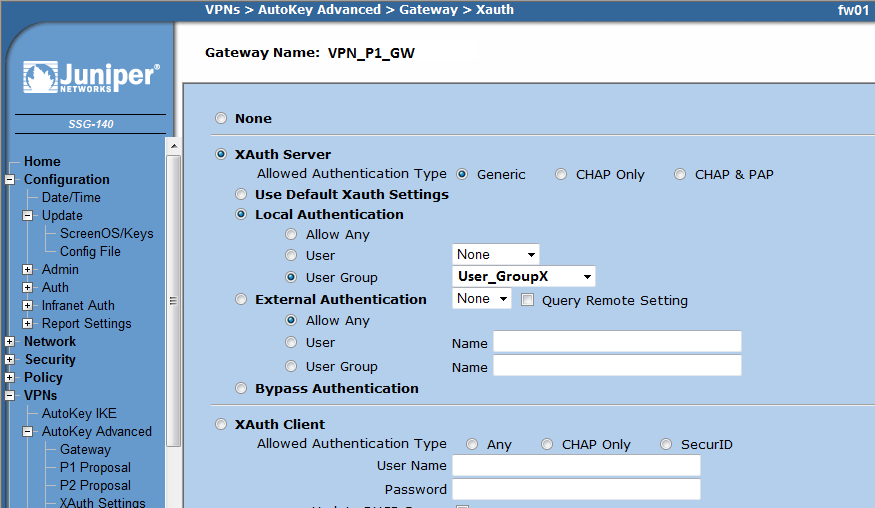
New Gateway - XAuth
- Click on Xauth on the new created Gateway object
* Select 'XAuth Server' - 'Allowed Authentication Type' Generic
* Select 'Local Authentication' - 'User Group' - <Name of your group previously configured>
Note: Of course here you can also you your radius server
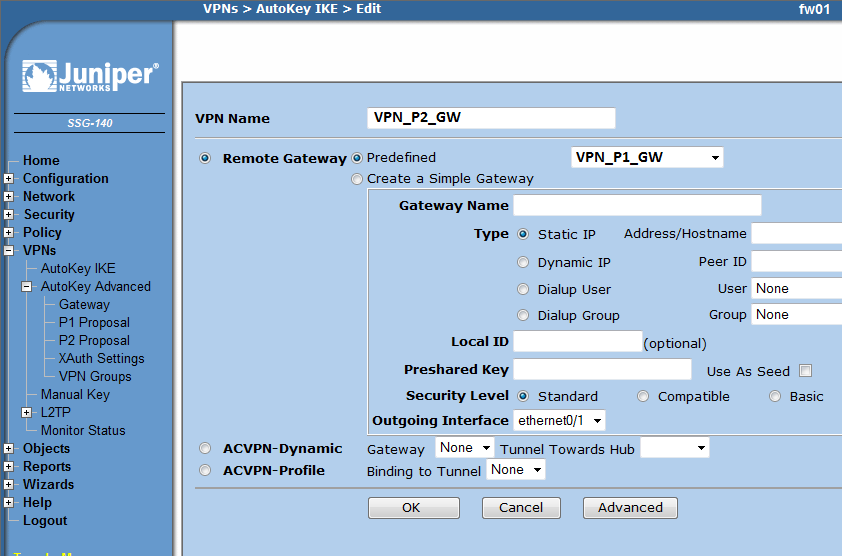
New IKE Instance
- VPNs -> Autokey IKE -> new
* Select 'Remote Gateway' - 'Predefined' and chose your previously created Gateway object
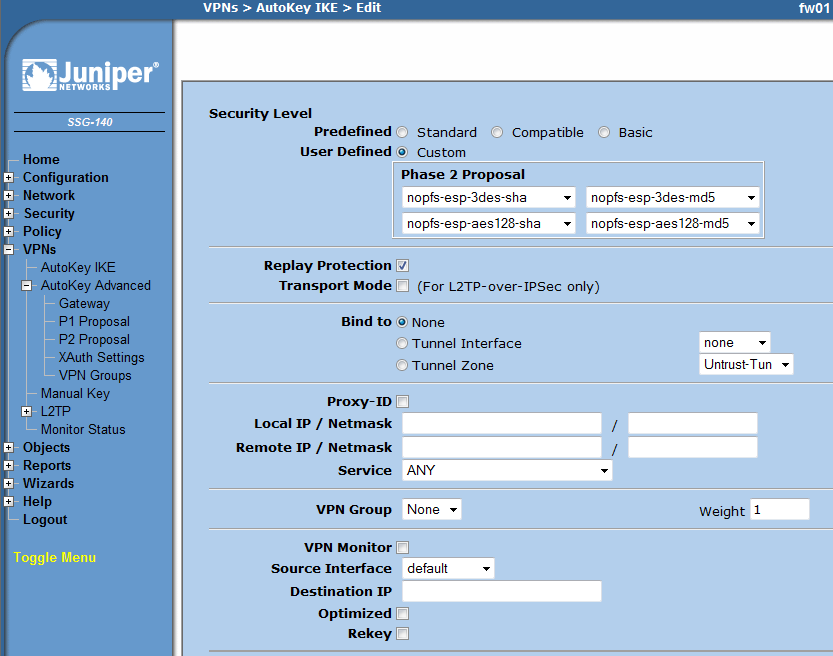
* Advanced
 * Under 'Security Level' select 'Custom' and chose:
   * nopfs-esp-3des-sha    nopfs-esp-3des-md5
   * nopfs-esp-aes128-sha  nopfs-esp-aes128-md5
 * Mark 'Replay Protection'
 * Adapt other setting to your needs
 * Under 'Action' select 'Tunnel'
 * Under 'Tunnel' select your previously created IKE object
New Security Policy
Configure the security policy to your needs:
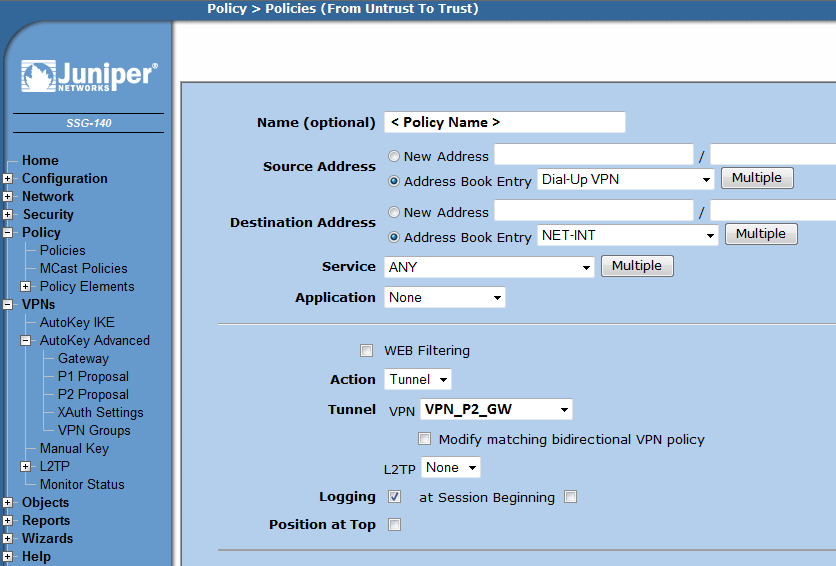
- Policy -> Policies
* Select From 'Untrust' TO 'Trust' and click new
* Under 'Source Address' - 'Address Book Entry' select 'Dial-Up VPN'
* Under 'Destination Address' select your desired target
* Under 'Action' select 'Tunnel'
* Under 'Tunnel' select your new gateway 'VPN_P2_GW'
Part III - Shrewsoft Client
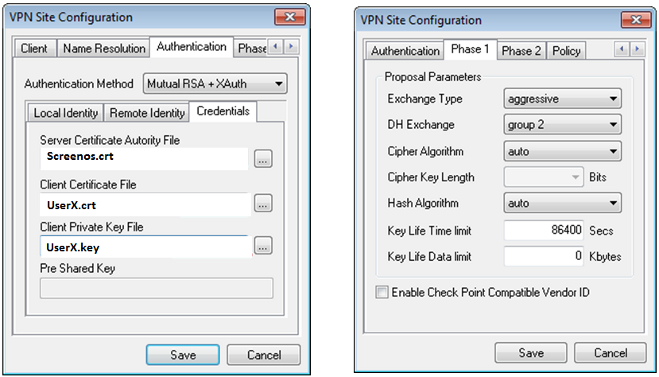
Here only information is given about the certificate specific configuration. The rest of the client configuration is identical to the one described here [1]
Additionally you have to place the CA certificate (CA.crt) into: C:\Program Files\ShrewSoftPATH\VPN Client\certificates\CA.crt (at lesat if using a self created CA certificate, otherwise the shrewsoft client cannot check the authenticity of the Screenos certificate).
Additional Information
Why do we need that subj.txt file?
Take a look at the certificate with the following command:
openssl  x509 -in Screenos.crt -text -noout
...
 X509v3 extensions:
     X509v3 Subject Alternative Name:
         DNS:vpn.mycompany.com
...
It seems this additional part is added automatically when the certificate is signed by a 'real' CA. In case you use openssl and self created certificates it seems this is not the case (unless configured).
Sources
Juniper Forum Topic [2]
